
Fender Tone Master Pro In Detail
I received some good feedback on the Quick Review with the valid point made that in one hour, I could not hope to fathom the full capabilities of the Tone Master Pro. This is absolutely true, so I made the trip and arranged to get one into the studio for 24 hours. The units are selling very well and I am appreciative of the 24 hour loan of the shop’s demo unit.
When I got the unit home and out of the shipping box, the first thing that I noticed was the unit packaging. A lot of time and money went into the box. I would say it goes to the same length that Apple used to go to in their packaging, and was very similar in quality to the packaging of my Neural Quad Cortex. Fender is an excellent marketing company and figured out that the unboxing experience matters to many people. It has no impact on the goods themselves, but does help people cross the psychological bridge that appears right after this size of expense. The packaging is as good as any that I have ever seen.
In the box with the device was the power cord, which is nice and long, a very good thing IMO. There was also a very long USB-C to USB-A cable. There were two laminated sheets, one a quick start guide which makes sense given the superb UI that I noted in my Quick Review and also an easy to follow Firmware Upgrade guide. In the day after release, Fender put out Firmware 1.1.100 which added a number of amps and resources,
Fender Firmware and App
As I do with photo and video gear, and guitar kit that uses firmware, I went to the Fender site, downloaded the IMG file for the new firmware and also downloaded the Fender Pro Control application. My computer for this deeper dive is a Macintosh and the install was very simple. If you are a Mac user, the firmware upgrade runs smoothly but the installer does not do a proper unmounting of the Fender Amp volume that gets attached when you perform the firmware upgrade steps. It’s not a crisis, but it does generate an error message about an improper volume disconnect. Windows does not care about unmounting volumes, but macOS being based on UNIX, cares very much. Regardless after following the clear on display instructions, the unit was restarted and the firmware update was complete.
Pro Control is available for Windows and for macOS. The machine that I am using is an older Mac Pro and is running macOS Monterey as Apple does not allow any of the more recent versions to install on this machine. Despite this, the Pro Control app installed and loaded without issue. I will spend more time on Pro Control later on, but the first thing that I noticed is the ability to use a mouse/trackpad to make fine adjustments on knobs on virtual effects, amplifiers, etc, is significantly better than my early complaint that the touchscreen on the device itself made precision changes challenging. If you have ever used the control applications for the Kemper or Cortex Control this is similar in look, and ease of use.
Presets
I am glad that I got the unit into the studio because there is a lot here that I did not encounter in my brief first review. The device comes with 95 pre-populated presets but the unit can store 504 presets in total. Unlike how the Quad Cortex does it which is in letter banks, the Tone Master Pro is one very long list. You can create your own presets and store them in any available slot or overwrite an existing one.. I would therefore encourage ANYONE who buys one of these to set your Fender cloud account, and use the Cloud Backup function in Settings to regularly backup your stuff. Presets are basically a collection of pointers and an ordering file so they do not take up a lot of space. You can, as on any modeller or multi-effects unit of note, set some presets as Favourites to simplify navigation. What pleased me was learning that Fender provides not only cloud backup, but also the ability for users to upload presets for sharing. To gain access, you just need to create a free account inside Pro Control. In setting up the account I was able to discover that Fender has selected Amazon Web Services for their platform. This is a very good thing as AWS is one of the world’s largest content distribution networks and virtual server hosting companies. The Tone Master Pro is still very new at time of writing, but there are already a lot of presets that have been uploaded by others, and some of the names are very familiar to folks like me who use both the Kemper and Quad Cortex communities for sharing. Plainly some of these people have had units prior to the official release date. If you find a preset that you want to try, you can choose Audition in Pro Control and the settings will be applied to the Tone Master Pro. You can also download a preset and then save it to a slot on the device. I found an effects only preset by YouTuber Leon Todd that emulates an original Rockman unit. It is my personal opinion that many of the factory supplied presets are overdone. This is not unique to Fender. I find most of the presets that come with the Helix or HX Effects need tweaking to not be quite so obnoxious. You will decide for yourself. You can also take an existing preset, modify it and save it as a new preset, and I find this handy.
Fender’s UI also allows you to define presets for specific songs, a very useful function for folks who play live and need fast changes such as bar bands, and worship bands. You can then take Songs and put them in Setlists. I find this structure very focused for the live gigging musician and while I am not one at this time, see great value in the idea.
Impulse Response Support
The Tone Master Pro via the Pro Control App allows for the importation and installation of Impulse Response files. I tested this with three IR profiles from a 1966 VOX AC30 using Alnico Silver speakers in a 2x12 cabinet and miked with an R121 and an SM545. I got them from Tone Junkie at no cost. Installing them was as simple as clicking the + sign in the IR Manager section of Pro Control, navigating to the folder with the IRs and after selecting the ones I wanted, clicking Open. They were uploaded into Pro Control and installed directly on the Tone Master Pro. From that point on, they are available to be put in the chain when you add a block and choose IR from the list. IR use is not a new idea, but I give Fender credit for making working with IRs as simple as they have. It keeps coming back to that excellent user interface.
Rear Panel
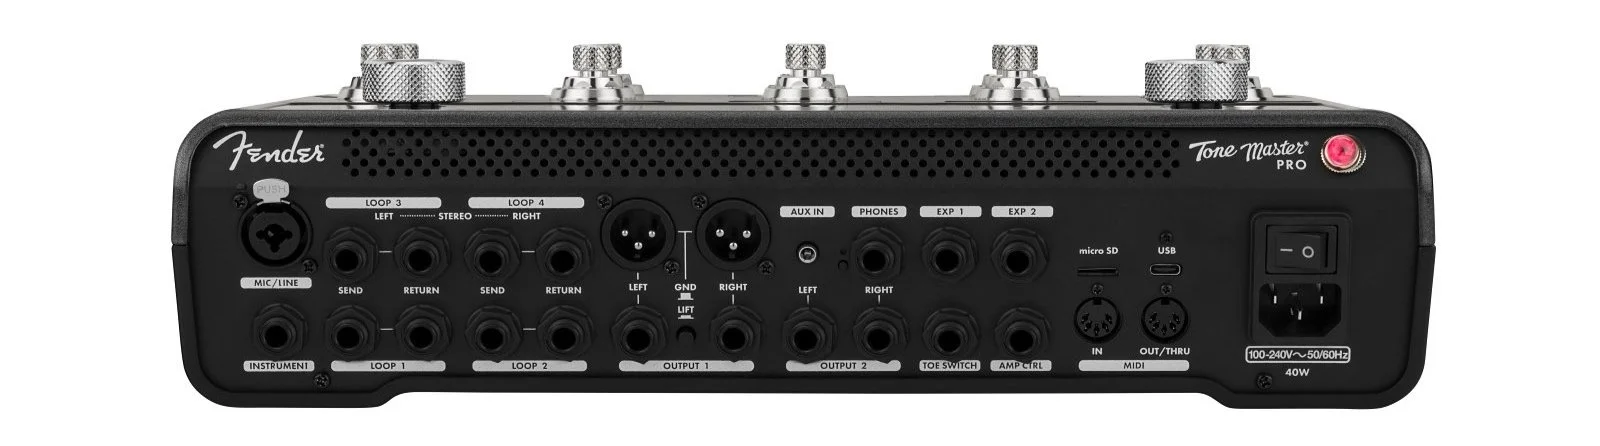
I touched briefly on the rear panel in my Quick Review, so let’s go deep this time. Going from left to right, the first section are the inputs, one balanced XLR/Line input and below it an unbalanced high impedance input for your guitar or bass. The next eight jacks are for the four separated Send / Return loops to allow putting outboard gear into your chain. Most people use these things to insert a favoured effects pedal, but if the inputs and outputs are at the right level, you could also use higher end rack gear such as compressors and limiters. Next we have the jacks for Output 1. These are a pair of balanced XLR outs and a pair of balanced ¼” TRS outputs. You can use them to go direct to a recording desk, a recording interface or to a pair of powered FRFR speakers. As I mentioned previously, Fender makes two FRFR speakers, one with a 10 inch speaker and the other with a 12 inch speaker. From an aesthetics perspective, they look like amplifiers but they are comparatively expensive and quite bulky. If that’s the look that you want, go for it. For my use cases, I would run this direct to the recording interface or direct to the PA in a live situation. Others may prefer to use FRFR speakers. It’s entirely up to the owner. Next we have the AUX in to allow you to use your personal music player to play along with songs. Beside it is the ¼ TRS headphone jack. I am pleased to see it be the professional ¼ size and not the smaller ⅛ or 3/32 size jacks. If you are going to use the device with headphones, do it right and use good headphones, closed back if you are recording solo, open back if you are recording with others. Below the AUX and Headphone jacks are the Left and Right jacks for Output 2. Fender’s documentation on these is pretty lightweight, but I think that they are TS outputs if you are using the Tone Master Pro as a multi-effector into an amplifier.
The Tone Master Pro can handle two expression pedals and has two independent inputs. One of the pedals EXP1 can have a toe latch to enable another function and the cable for that will go from the Toe jack on the Expression pedal to the Toe Switch jack on the Tone Master Pro. Fender has contracted with Mission Engineering to build their expression pedals. I have Mission Engineering pedals for both my Kemper and my Quad Cortex and they are superb products. The Fender pedal by Mission Engineering is selling for $175 USD, $16 more than the other pedals. I cannot explain why that is as it delivers the same dual functions as the Mission Engineering pedals for Kemper. I fear that you are paying more for the sticker that says Fender. So it goes.
There is also a single amp controller jack which I presume is a ¼ TRS jack to use with an amp that can take an input to perform channel switching. There are two 5 pin MIDI connectors as well as a slot for a MicroSD card and the USB-C jack to connect to your computer to facilitate the use of Pro Control. I mentioned a nice long power cord and the power switch is sideways mounted so may perhaps prevent an inadvertent turn off. Finally there is a classic Fender jewel lamp that glows red when the unit is powered up and it is bright enough to be seen in daylight.
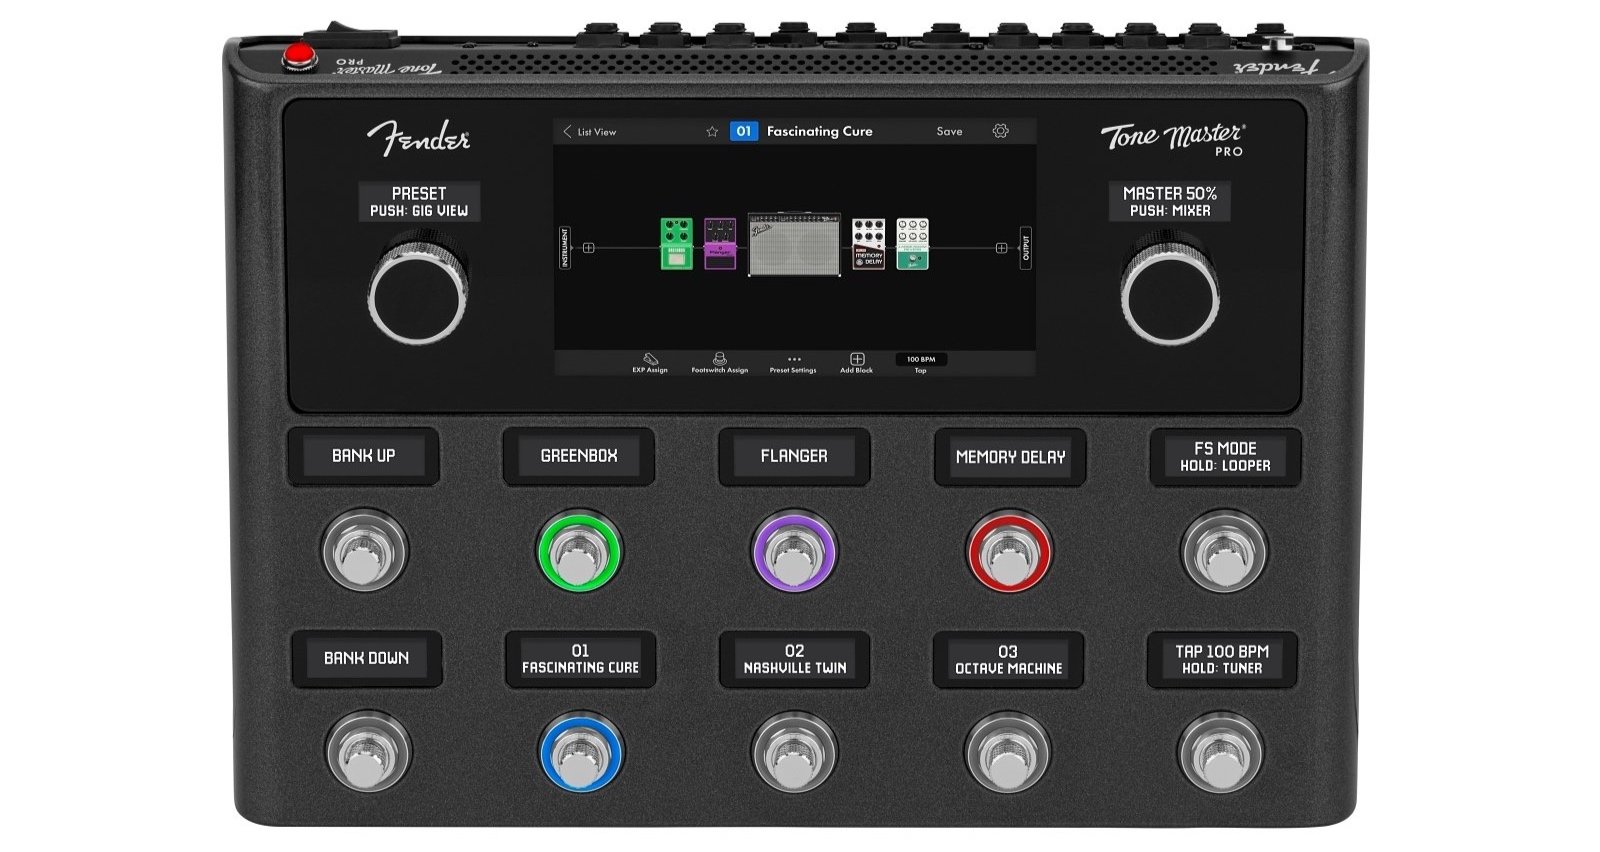
Top Deck
The top deck is pictured at the beginning of the article and again here.
Top left is the rotating knob that you can use to move between presets in PRESET view. Pressing the knob puts you into GIG view which shows you in large numbers the active preset along with the preset name. In the middle is the touch screen which is just a bit wider and taller than the display on my iPhone 12 Pro Max. It’s easy to read close up, but while beautiful, is hard to read if you are standing and playing live. I think that most serious musicians will only use the detailed display as shown above when constructing presets, but if you have 20/40 vision may be you could use it live. The right knob controls the output level and a push will reveal the output mixer, where you can set individual output levels for the headphones, the output jack sets 1 and 2 and also for the 4 USB channels that appear when you connect the device to your computer via USB. I’ve included a screenshot of how the Tone Master shows up in the Mac Audio Devices window when connected via USB.

The default clocking is 44.1 KHz, but this is adjustable to 48 KHz, 88.2 KHz or 96 KHz as you desire. The screemshot shows the Input settings, the Output settings are the same but there is no Thru option of course. This means that when connected, you can use the Tone Master Pro as your interface into your DAW. It does not run as a plugin, just as a standard USB input. Recording engineers will find this useful.
Looking at the User Interface

I have made a number of screenshots for you to see what I am talking about to make things easier to understand. I used Pro Control to make screenshots as it mirrors what is on the unit itself. I will start with screens from the Settings area. The first is IO. In this image showing the Inputs configuration you can adjust. Similar options are available for Outputs, Expression / Ctrl pedals, USB and MIDI. It’s very simple to use.

We can then move on to the Footswitch configuration screen. It provides the ability to configure the global settings for what appears in the scribble strips for the Presets mode and the Effects mode for the footswitches. In presets mode you can show six presets or 3 effects over 3 presets or 3 presets over 3 effects. It’s really just layout control but I suppose some users will find it useful. In effects mode you can have the footswitches control either 6 effects or 8 effects. Tap Tempo allows you to determine if the Tap Tempo function is consistent globally or by preset. The Tap LED control allows to have the Tap switch blink consistently, momentarily or not at all.
Then there is a simple setting to enable Bluetooth and to set your Bluetooth advertised name. I paired my iPhone with the Tone Master Pro hoping that maybe there was an app for the phone to allow control of the device. I could not find anything on the App Store but I can play music from my iPhone through the Tone Master Pro. Called me jaded but big whoop. That creates no value to me.
The global EQ function is much more useful. While you can set EQs for each preset of course and also use EQ pedals in your presets, the Global EQ is nicely executed. You can build four user presets and in addition to regular dB controls on the sliders there are preset tap selections for high pass, low pass and levelling options. You can also determine which of Output 1, 2 or both that the Global EQ applies to.

The Output Mixer controls the output levels for the Headphones, Output 1, Output 2 and USB ports 1 & 2, USB port 3 and USB port 4.. You can also determine if a port can receive signals from the AUX input or from Bluetooth, and also Mute or Solo outputs independently. It’s a very nice feature. In my test recordings found below, I determined that the factory output levels for USB were way too low and I ended up maxing every one of them and even then the output signal was lower than I would have like for USB recording.

Working With and Building Your Own Presets
This is incredibly simple. I found it easiest to navigate to an empty slot and select it. Then you can add the amp(s) and effects in the order you wish. The mixer element is handy if you want to do some parallel processing into multiple amplifiers or parallel process effects and be able to control the level of the parallel chains independently. While there are a limited number of programmable footswitches available, the Tone Master Pro doesn’t appear to limit the number of effects in a preset. Or at least I have not managed to choke it so far. Moreover, it is easy to set up effects after the amp and before the cabinet, which is effectively like using an effects loop on a physical amplifier. While you cannot program different orders of effects in a single preset as on a GigRig, that is kind of an esoteric function. Changing the order of effects is really easy, just drag on the touch screen. Here’s a sample shot of a factory preset as you would see on the device (without the Presets column) or as in Pro Control

In this case, I have clicked on the Amplifier Half Stack in the preset and I can see and manipulate the amp controls, set the preset amplifier output level, turn on the five stage Noise Gate for the amplifier itself and even bypass, replace or remove the amp block entirely. It looks beautiful, but to adjust the knobs you are going to want to use the rotary functions of the footswitches that I discuss later on. Trying to do it on the touchscreen is imprecise and can be frustrating. As this block holds a “half-stack”, you can also change the microphone positioning by clicking where it says 4x12 EVH 5150.

In this example, the Wide Eddie preset, we find a chain meant to simulate an Eddie Van Halen configuration. The signal goes through an emulation of an MXR Phase 90 and then to an EVH 5150 head. The signal is then split to go to two separate studio delays to emulate Mr. Van Halen’s use of a two channel stereo delay. BOSS recently released a physical pedal to replicate Mr. Van Halen’s sound the EVH SDE-3000 for those wanting the real thing. The delays each run into their own 5150 4x12 cabinets and then another splitter is added to recombine the signals to go through a Fender Reverb pedal and finally to the output.

In the above capture we see a different preset. Just as you can tap on the amp to adjust its virtual controls, you can do the same for an effects pedal, as you will see for the Chorus pedal below.

It’s nicely done, but is not a new thing for a Multi-Effects unit or Modeller.
Since the Tone Master Pro does both amplifier and cabinet simulations, you can also control the placement of the virtual microphone in relation to the speaker in the cabinet.

All such devices have some way of controlling microphone selection and placement. Fender has made this pretty easy to do. I find the microphone options on this release a bit skint but they usual suspects of an SM57, Royer 121 Ribbon and the AKG C414 are present. No Neumann emulations though and no Beyerdynamics. Fender can likely add more in future updates. Unlike most other tools, you can only use one virtual microphone on a cabinet, which as an engineer/producer I find lacking.
Foot Switches
There are ten foot switches. The default settings reserve the top and bottom footswitches on the far left for BANK UP and BANK DOWN in Preset selection mode, and you can configure the device for either 6 or 8 programmable effect switches. The two switches on the far right are FS MODE on the top and TAP TEMPO on the bottom, These switches are not reprogrammable. Each switch does have a rotary control area, so you can use it like the switches on a Quad Cortex for value changes of an effect. This is much easier than my first attempt which involved tap and drag on the touchscreen. To activate this, tap the device in the chain on the touchscreen and the footswitches become rotary knobs assigned to the knobs on the device. This is very elegant and you can bend down and tweak stuff just like a real pedal board. The Quad Cortex has had this since its inception, but no smacks at Fender for copying a proven success.
The top right switch selects between preview select mode and what other devices call stomp box mode. It switches the display in the scribble strips from the preset name to the effect that is programmed for that foot switch. If you hold the switch down, this invokes the built in looper, which is pretty straightforward for anyone accustomed to using a looper The bottom right switch is for TAP TEMPO. It defaults to 120 BPM and you, go figure, tap it to get the BPM you want. Hold this switch down to activate the built in TUNER. It has a large easy to see display that shows the note with a range of plus or minus 50 cents. When I tried it in the store I found it jumpy and still did in the studio. That’s unfortunate because an integrated tuner that works should be a given and I would still put a Peterson Stomp tuner between the guitar and the input because the internal tuner is just weird.
Assigning a foot switch to an block is easy and you can assign a single switch to multiple blocks. The scribble strip by default uses the block name, which is great unless you do a multiple assignment but you can then create a custom label to make the scribble strip say something more useful than Multi.
You can also set a foot switch to change between two parameter values such as depth on a chorus effect. The interface is pretty good and the learning curve is not steep.
These are all very useful features and while none of them are groundbreaking, the quality of the user interface does make like easy.
The Sounds
Well, this is where things still go a bit sideways. I would continue to say that the emulations of the Fender amplifiers are really superb. I have also had the opportunity to try the EVH family at appropriate volume and think that they are pretty good too. I remain underwhelmed with the Marshall, Mesa Boogie and Bogner emulations. The AC30 that I hated so much was based on a preset allegedly built to sound like Brian May. I built my own AC30 based preset and it was better. Still not sounding like an AC30 but there was a mostly decent amount of chime. I am afraid that a high end modeller like the Tone Master Pro should model a variety of amplifiers well. It is fantastic with Fender amps, and I was able to build a ‘65 Super Reverb that is easily as good as my Super Reverb profiles on the Kemper and on the Quad Cortex and it does sound like the Tone Master Super Reverb I used for recording some months back. The device is NOT a profiler so while I am pleased to see user built presets shared in the cloud, they have to be built with what’s in the Tone Master Pro and that is going to be a gating factor if you want a preset based on a non Fender brand amp. Since the first firmware update added a bunch of new kit, owners can hope that future firmware updates will add more options.
I did find that the effects emulations are rather noisy and when you have a busy chain, you need to add a noise gate in there. With single coils it’s worse and the noise gates provided are ok but not great. If I was using this all the time, I would use up two send / return pairs to put in my Decimator. The noise is often there whether the virtual effect is bypassed or not and I would hope that this would get fixed in a future firmware version.
In my sample recordings below. I built all my own presets using the Fender supplied amps and cabinets. I did not use any of the effects in my plugins (except for my ‘65 Super Reverb) because I wanted to isolate just the amp / cabinet sounds. I did try a number of the effects and they sound no better than the effects that come in a Line 6 HX Stomp, HX Effects, or Helix. They’re not worse either, but the scope of the available effects is more limited than on those platforms and in my opinion, they at best approach the sound of the effects that they are trying to emulate. Presonus Studio One+ has a bunch of guitar effects included, and the effects on the Tone Master Pro sound like them to my ear. Fender bought Presonus at the end of 2021 so I could not blame them if they repurposed some of the sounds that come with Studio One.
Recording
As I am doing this in the studio, I am doing recording in two ways. The first, is the method simplest for the general user, which is using the Tone Master Pro as your instrument interface to your DAW via USB. I am using Logic Pro, but this will work with any DAW where you can choose the active interface for inputs. The second is how I usually do things, which is to take the balanced XLR outputs and run them as a pair to a recording interface. I use both Universal Audio and Clarett+ interfaces and both have excellent preamps on their inputs. Personally I find USB direct to be a bit too digital sounding for my liking and prefer running through a nice analog preamp to record. It does mean that the recorded tracks have all the effects baked in, so no changing things after the fact, but for lots of folks, this is all that they need.
So let’s get to the samples that I will share. These are all recorded using the Tone Master Pro via USB into Logic Pro. While I did make recordings using the balanced XLR outs, the preamps in my interfaces added colour (beneficially in every case) to what came out of the Tone Master Pro, so I am not posting those because they do not accurately convey the sound of the presets as people will hear them through a good FRFR or recorded as most folks will do. Please note that Fender does not name the profiles accurately for non-Fender amps. This is not Fender being obtuse or difficult, it’s a trademark use of names issue. The samples are based on my own created profiles and the names come from me with the goal of clarity.
The guitar used for all the samples is a early Seventies Gibson Les Paul that started life as a Deluxe but has been modded both before and after I bought it in 1976. The wiring has been converted to 50s wiring and the pickups are Seymour Duncan Antiquities. It’s over 10 pounds and has the Norlin era sandwich body, and the sunburst was definitely sprayed by someone wearing a welding helmet, but it has served me well for nearly fifty years.
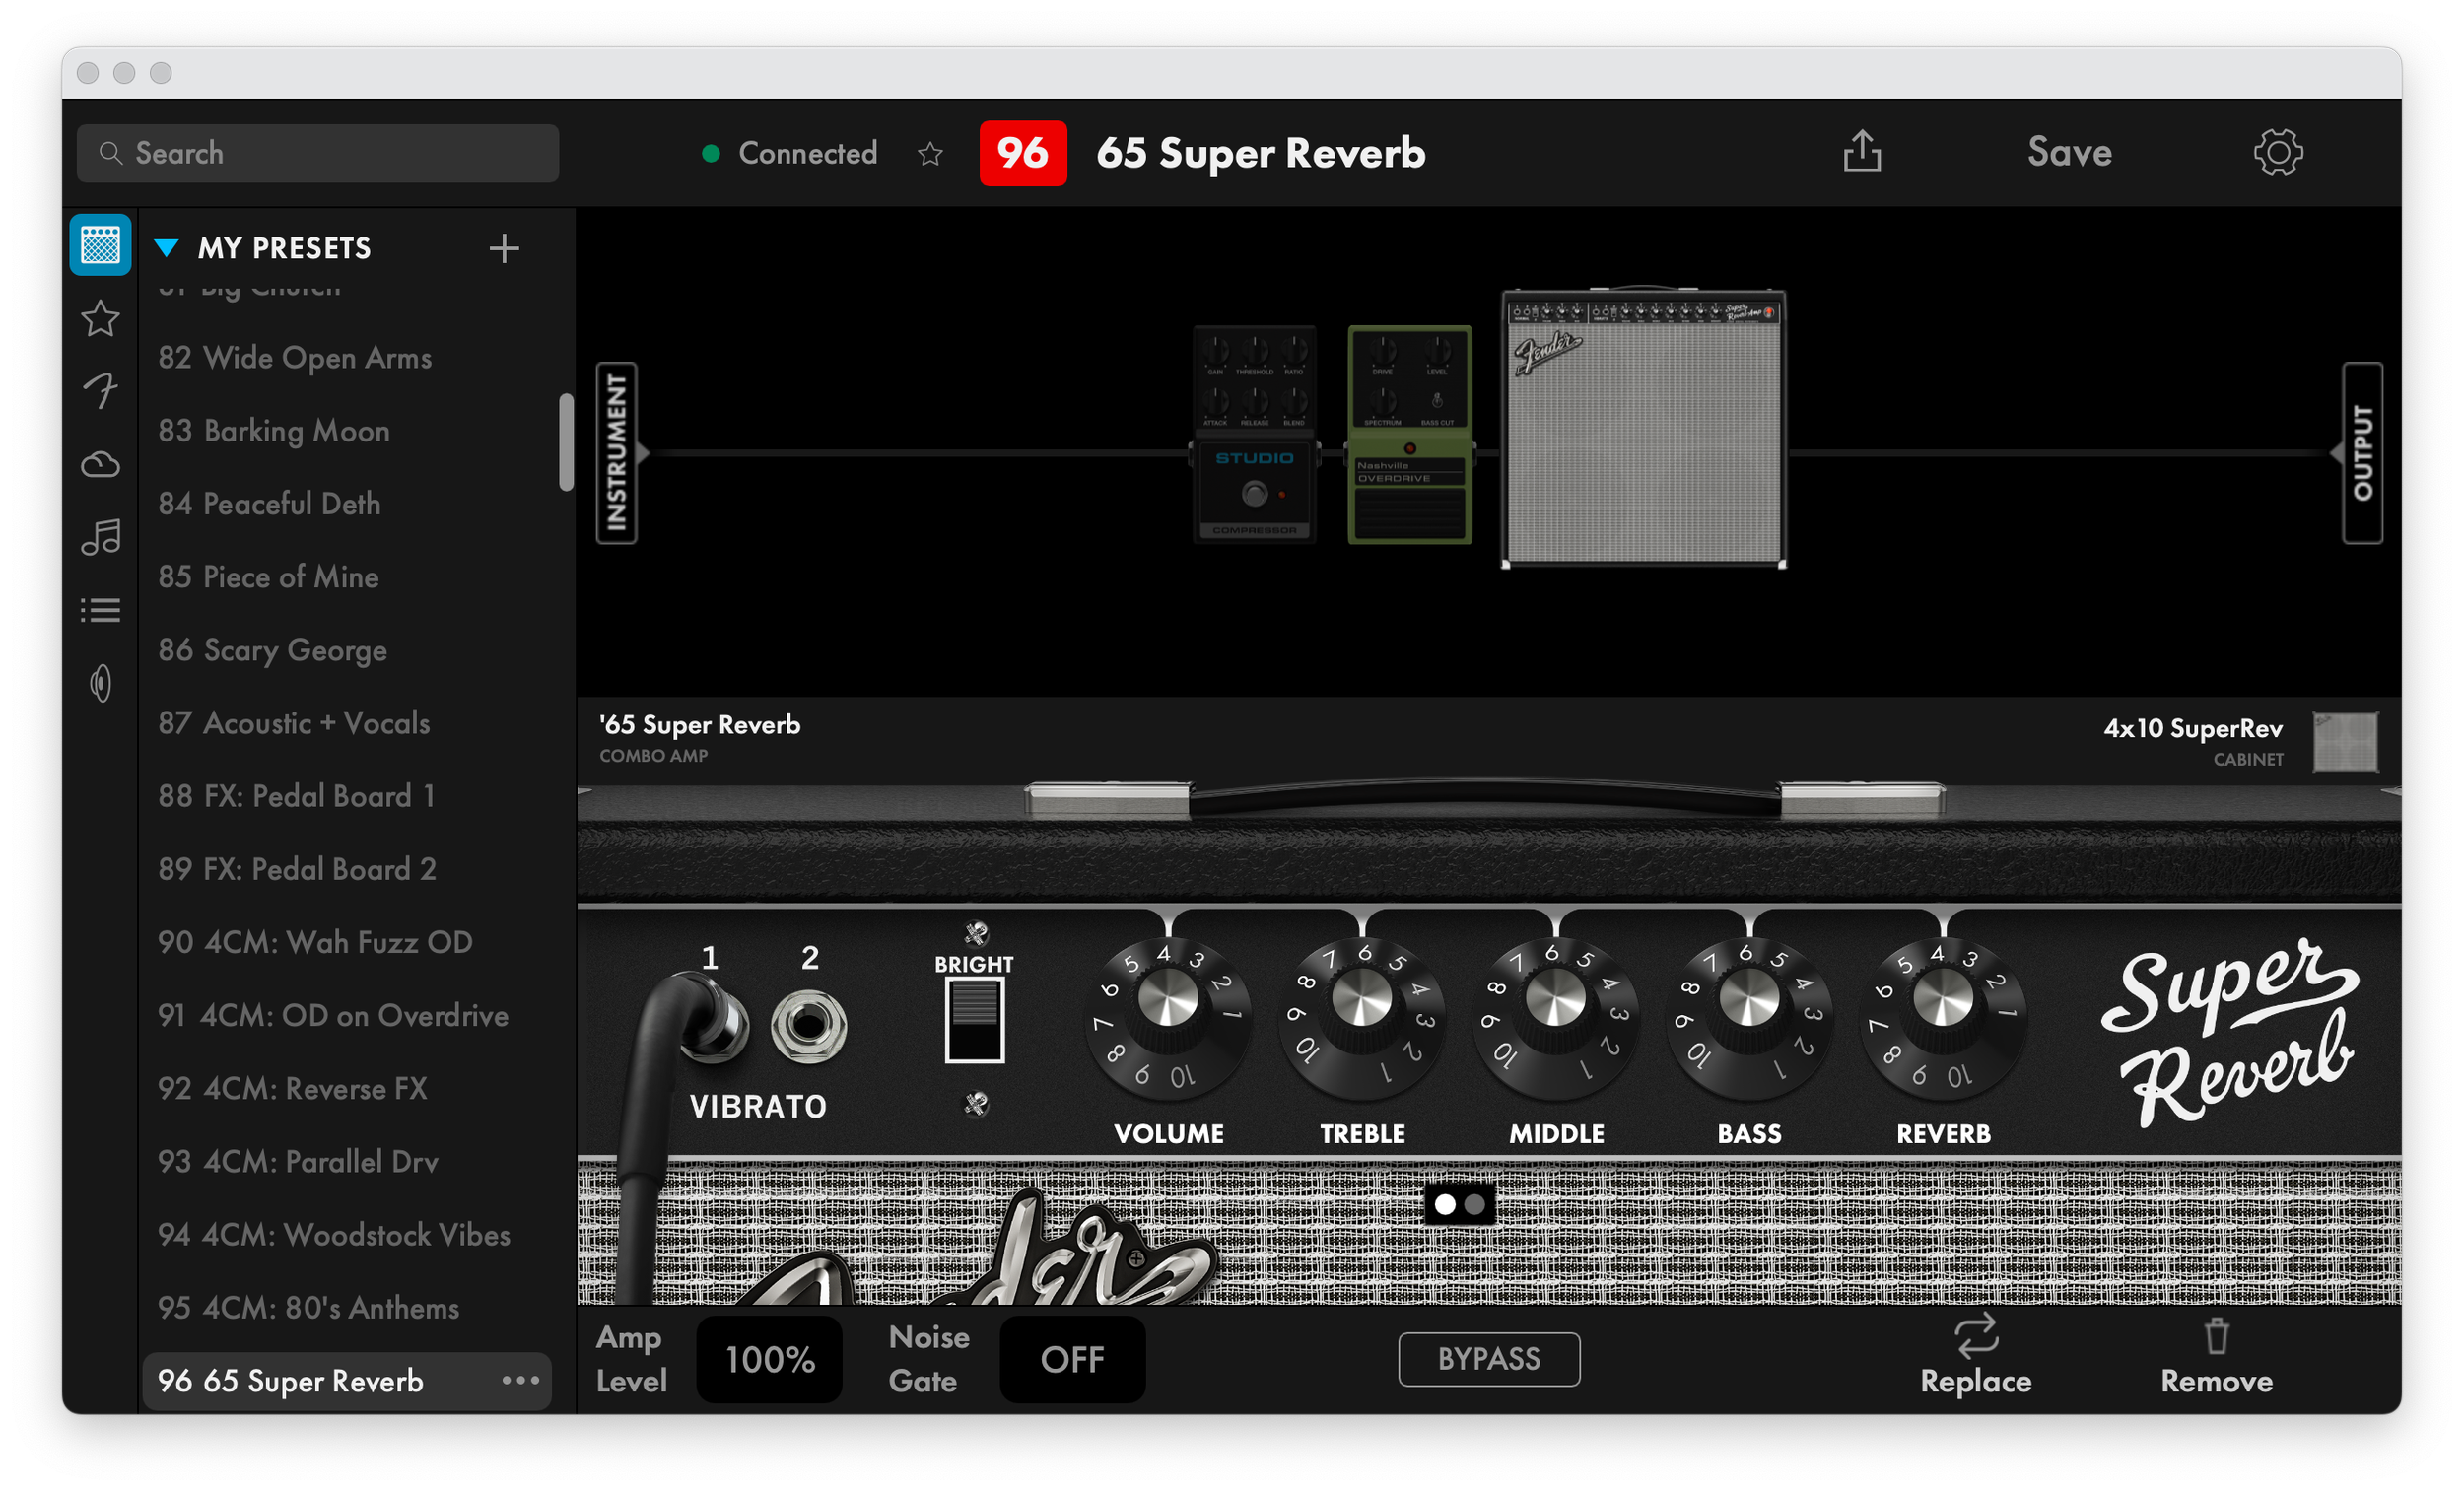
Fender Super Reverb
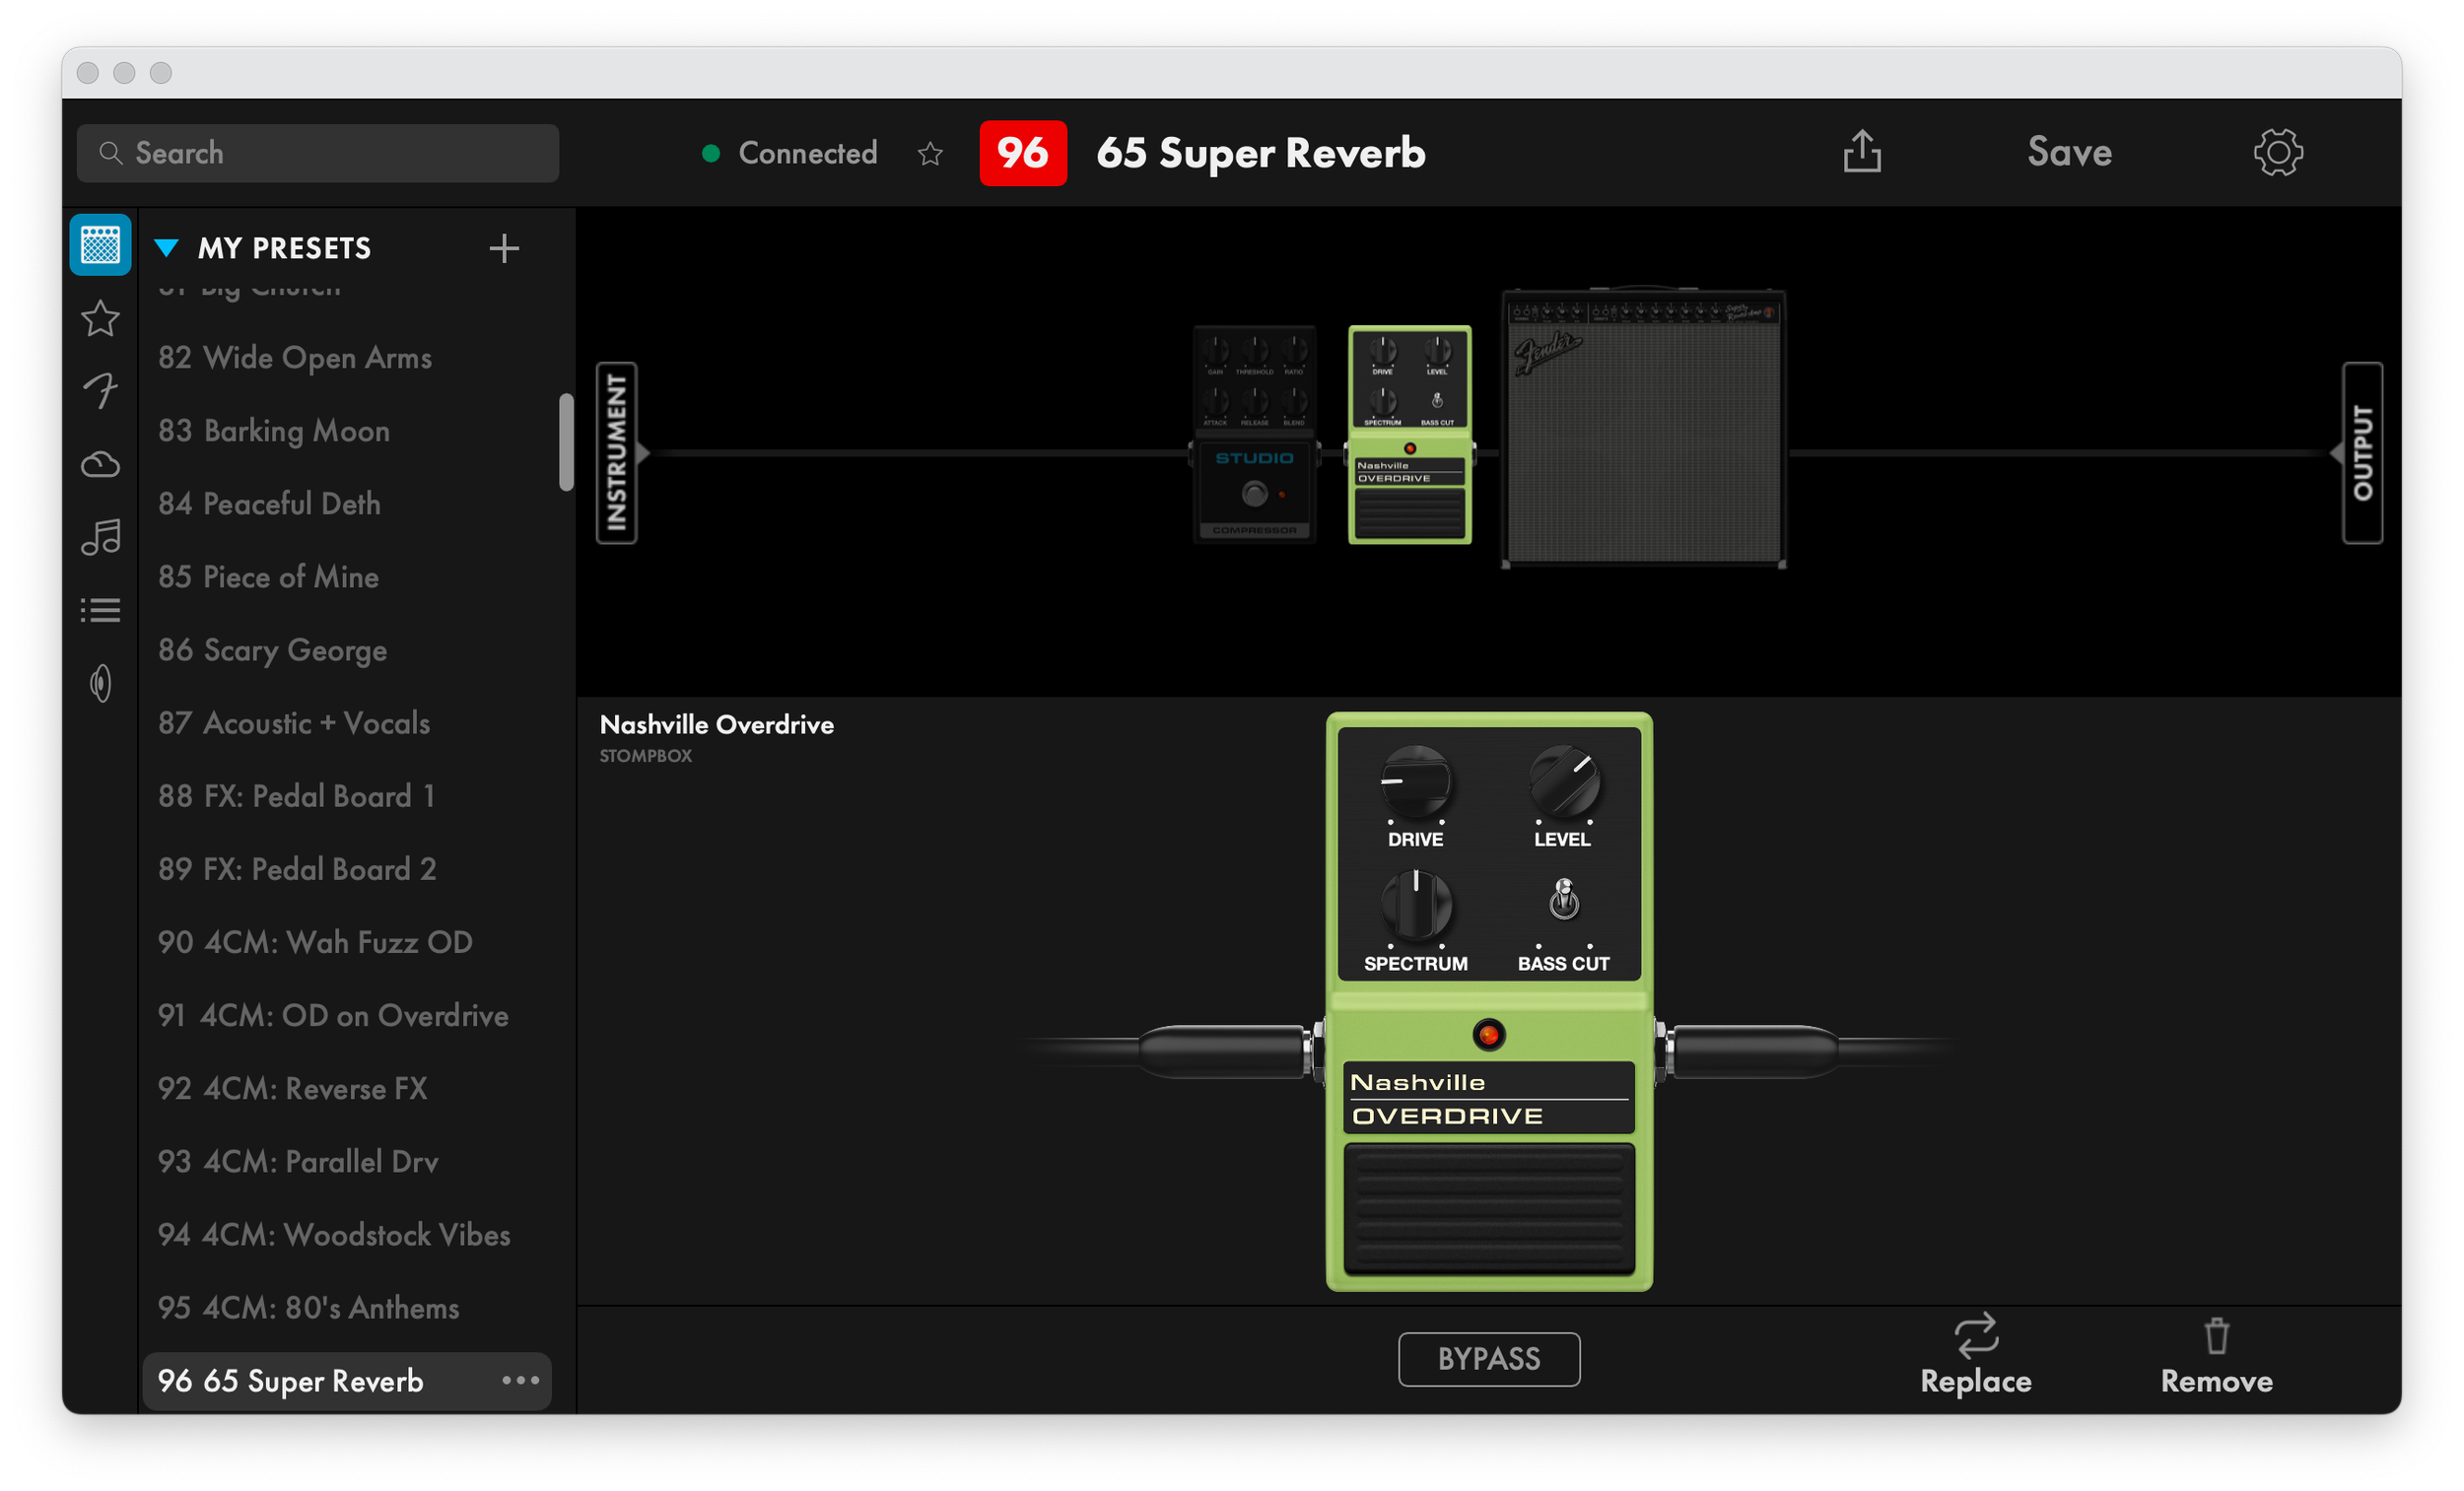
This sample consists of two parts. The Super Reverb with a studio compressor and the Super Reverb with the Fender emulation of a Nobels ODR-1. I have provided screen shots below the sample for reference. The clean version is quite nice and the dirt version is also pretty decent sounding but does not sound like a real ODR-1 into a Super Reverb and as I use both, I do actually know. The second graphic shows the amp face zoomed in. The settings on the amp are identical for both parts of the sample. As this preset has effects in it, I have added screenshots of the compressor and ODR-1 settings.


Marshall 2555 Silver Jubilee
My next recording involved three different presets built from the Fender provided profiles of the Marshall 2555 Silver Jubilee. I know this amp PERSONALLY as a real won is about 30 feet away. You may like the sounds the presets deliver but they do not sound like my real Silver Jubilee. As you will see in the screen caps, Fender produces three profiles, for Clean, Rhythm and Lead.


Vox AC 30
I used the Fender factory profile for the Vox AC30. The default is fairly gritty so I made a modification to see if I could get the expected chimey clean tones. I was able to clean it up, but as the owner of two different AC 30 amplifiers, the Fender profile does not sound like either of them. The sample has a clean example and then an overdriven one.


Mesa Dual Rectifier
I built a single preset that uses the Fender supplied profile of a Mesa Dual Rectifier. It doesn’t sound awful at all, but it doesn’t sound like a real Dual Rectifier either.

Bogner Uberschall
Missing in Action?
The next preset that I built for this article uses the Fender supplied simulation of the Bogner Uberschall. This is another amp that I know quite well. Again it does not sound awful, but it doesn’t sound like a real Uberschall either. In building the preset I was very frustrated. On my Quad Cortex, I frequently split the signal path for routing to different cabinets or to do wet / dry. The Fender Tone Master Pro does have a little entity that you can use in a preset to split the signal or to recombine split signals. Fortunately you can save an existing preset in a different slot and then edit out what you don’t want because I spent way too much time trying to figure out how to add the splitter to a new preset. As there is NO documentation of any value, I never did figure it out, so duplicated a preset that had one, deleted everything and then built my two cab Bogner preset so I could have two different cabs with two different microphones. I don’t know if this is a bug or that the mixer is actually not available for user insertion. Whatever the reason, it’s a fail.

Fender ‘59 Bassman
This is the last preset that I built for this article. I expected it to be awesome, considering that the profile was done by Fender of their own Bassman amp. I own a lot of amplifiers, but my Bassman is used most. It is the dry amp in a wet / dry /wet rig where the left and right side wet amplifiers are Fender Hot Rod Deluxe Mark IVs, Fender Special Run versions each with a Celestion Creamback. For those who say I just hate Fender, I say that the volume of Fender kit here proves your assumption completely wrong. Please note that the Fender profile delivers the Bassman jumped, which is what I do on my own Bassman as well. While I thought that the presets made from existing Fender Tone Master amps were excellent, this Bassman profile misses the mark in my opinion. You can judge for yourself as you can with any Fender provided amp / cab profile.

FRFR
While I am comfortable monitoring the sound of the device and the recording through studio monitors, I did move the unit to another location and plugged it into a Headrest 2000w FRFR. It sounded clean like any other FRFR would and very much like my studio headphones.
Cosmetics
The unit I used is a store demo device. The plastic is still on all the LCD panels and the gunmetal facing remains in good shape after nearly a week of being used. The back however is disturbing. I think it is painted, not powder coated and while the unit has been sitting on those carpet covered risers or on one of the Fender FRFR cabinets, there are already scratches showing to the bare metal. Someone asked if you could mount this to a pedal board and the answer is yes if it is at least three rows high, but you would need to remove the ¼” tall rubber feet and use a goodly amount of 3M Dual Lock to keep the unit in place because it is very heavy. It weighs about as much as my Kemper Stage and about twice as much as the much smaller Quad Cortex.
Conclusions
In my quick review, I said that there were good things and things that I did not like about the device in the one hour that I had with it. Now with well over 12 hours working on it with a few breaks for more coffee, I find myself in pretty much the same place. The Line 6 Helix is bigger but includes an expression pedal and costs about the same. The Tone Master Pro Fender amp and Fender cabinet simulations are in my opinion, better than the ones on the Helix, but the non-Fender amps on the Helix sound better to me. The Kemper Stage is more money and while it is massively powerful, its interface has aged and the small mono display looks out of date. The Kemper app works great and you use it like the Tone Master Pro, just connect the device to the computer by USB. The Kemper also uses Liquid Profiling which is quite a bit more advanced in terms of audio reproduction than the Tone Master Profiling that Fender says that they use but have not released any details of. Of course, the Kemper is a true profiler and the Tone Master Pro is not. The Kemper stage is limited to four effects in front of the amp and four after it while the Fender product does not have these limitations. Still when it comes to the amp and cabinet sims, the Kemper is superior to the Fender in everything except the Fender amps and cabs where in my opinion, they are equally good. I do not have the Headrush modeller, nor do I have an AxeFX so I can offer no insight in those areas. The Neural Quad Cortex costs the same as the Tone Master Pro, and while the UI is not as pretty, it works perfectly well and the Quad Cortex is a real profiler and the factory profiles sound spectacular and there are a ton of user created profiles made with their own amps, cabinets and effects that offer a wide range of options. Like the Kemper and the Quad Cortex, there is a risk with the Tone Master Pro of option paralysis and that should be something to think about.
The Tone Master Pro is not as bad as my one hour session suggested. I think it balances out with the Helix because each have their own set of advantages and disadvantages. I like the sound of the Kemper more but have to give it to Fender when it comes to the shorter learning curve. In the end though, I would still choose a Neural Quad Cortex first. For the same money, there is just so much more there. It’s also half the size and half the weight. I would always say try them for yourself, but be careful that the store staff actually know what they are talking about. Some are excellent but there are many who have never spent any serious time with any of these devices. Do be aware that the Tone Master Pro documentation consists of a multi page warranty statement, safety sheet, and two copies of a double sided quick start guide. For a device this powerful, the lack of documentation is a sin and the product manager needs a beating. While I did like the interface, if you do have a question, there are NO resources to help you.
I am aware that recent actions by Fender have caused me to think less of the company. Constantly jacked prices, new guitars for more money with a different colour palette, selling direct and bypassing the dealers who made them successful and a deficit in quality now going into its second year. I have endeavoured to not let that bias get in the way of this review, and I have been mostly successful, but I still see the unit as overpriced for what it does with a premium charged for the Fender logo. Bring the MAP down to $1999.99 from $2349.99 and they widen their market and create a price differential with the Neural Quad Cortex which is well established and already has a proven history of excellent support. Fender won’t do that because this close to release the boxes are selling really well. We will see if and how that changes in six months. For the dealer’s sake I hope sales remain strong, and they don’t get stuck with excess inventory.
Thanks as always for reading and until next time, peace